


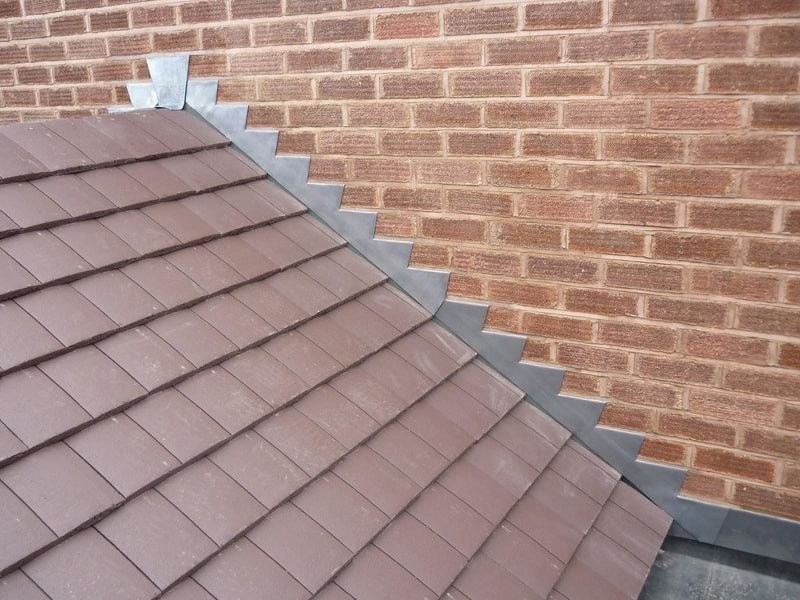
Step flashing is a series of L-shaped metal pieces — each roughly 4 inches wide by 4 inches tall by 8 to 10 inches long — installed where a sloped roof meets a vertical wall. Each piece tucks under a shingle on the roof side and behind the siding or counter-flashing on the wall side, creating a waterproof staircase that directs water down the roof instead of into the joint between the wall and the roof. The name comes from the way the pieces “step” up the wall, one per shingle course, following the roofline as it rises.
Without step flashing, the junction where a roof meets a wall — a dormer sidewall, a chimney, a second-story wall offset, or a garage wall — is an open gap. Rain runs down the wall, hits the gap, and pours into the roof deck. Step flashing is the barrier that closes that gap, and it is so fundamental to waterproofing that the International Residential Code requires it at every roof-to-wall intersection in new construction.
How Step Flashing Works: The Water-Shedding Staircase
The step flashing system works on a simple principle: water running down a wall must land on top of a piece of metal that directs it onto the surface of a shingle, where it can run down the roof to the gutter. The sequence is repeated for every shingle course up the wall.
Each piece of step flashing is installed with the roofer’s standard process for a shingle course: lay a shingle, install one piece of step flashing on top of the shingle with the vertical leg against the wall and the horizontal leg extending onto the shingle, then lay the next shingle course on top of the flashing’s horizontal leg. The next piece of step flashing goes on top of that shingle, and the cycle repeats. The result is a shingled pattern where water cascading down the wall hits the vertical leg of a flashing piece, runs down to the horizontal leg, and flows onto the shingle below — never touching the wall-roof joint.
The critical overlap rule: Each piece of step flashing must overlap the piece below it by at least 2 inches, and the horizontal leg must extend at least 4 inches onto the roof deck. The overlap prevents wind-driven rain from blowing sideways between the flashing pieces, and the 4-inch extension ensures that water running off the flashing lands on the shingle below, not on the underlayment at the shingle edge.
Where Step Flashing Is Installed on a Roof
Step flashing is required at every location where a sloped roof surface runs up against a vertical wall. The most common locations:
- Dormer sidewalls. A dormer window projecting from the roof creates two vertical walls where the dormer meets the main roof plane. Both sides require step flashing from the eave to the ridge of the dormer.
- Chimney sides. The sides of a chimney that run parallel to the roof slope use step flashing. The front and back of the chimney use different flashing types — apron flashing at the bottom and a cricket or saddle flashing at the top — but the sides are step-flashed.
- Second-story wall offsets. On a two-story house where the second floor is smaller than the first, the roof of the first floor runs into the second-story wall. That wall-to-roof intersection is step-flashed along its entire length.
- Garage-to-house wall connections. An attached garage with a sloped roof that meets the main house wall requires step flashing along the wall.
- Skylight curbs. The sides of a skylight curb that run parallel to the roof slope use step flashing. The top and bottom of the skylight use continuous head flashing and apron flashing, respectively.
Step Flashing Materials: Metal Choices and Lifespan
Step flashing is made of metal — the question is which metal. The choice affects how long the flashing lasts, how much it costs, and whether it can be used with certain roofing materials.
| Material | Typical Lifespan | Cost per Piece (8×4×4 inch) | Best For | Notes |
| Galvanized Steel (28-gauge) | 20-30 years | $1-$2 | Budget, asphalt shingle roofs | Will rust eventually in wet climates |
| Galvalume Steel (24-gauge) | 30-50 years | $2-$4 | Standard residential asphalt shingle | Better corrosion resistance than galvanized |
| Aluminum (0.025 inch) | 30-50 years | $3-$6 | Coastal homes, asphalt shingles | Cannot touch pressure-treated wood (corrosive reaction) |
| Copper (16 oz) | 50-100 years | $8-$15 | Slate, tile, copper, historic roofs | Self-healing patina, premium appearance |
| Lead-Coated Copper | 70-100 years | $10-$20 | Premium slate and tile | Matches slate and copper roofs |
| Stainless Steel | 60-100 years | $10-$18 | Industrial, extreme coastal | Maximum corrosion resistance |
The flashing material must be compatible with the roofing material and the fasteners. Aluminum flashing in contact with pressure-treated lumber corrodes rapidly because the copper-based preservatives in the wood react galvanically with the aluminum. Copper flashing in contact with galvanized steel fasteners creates a galvanic cell where the steel corrodes. The rule is simple: the flashing metal, the fasteners, and any metal it touches should all be the same metal or galvanically compatible metals.
Counter-Flashing: The Other Half of the System
Step flashing alone is not enough. The vertical leg of each step flashing piece is only 4 inches tall, and water can blow behind it in a driving rain. Counter-flashing covers the top of the step flashing and is embedded into the wall itself.
On a masonry wall (brick or stone chimney), counter-flashing is a separate piece of metal cut into a groove in the mortar joint and sealed with mortar or silicone. The counter-flashing hangs down over the step flashing, creating a shingle effect on the wall: water hits the counter-flashing, runs down onto the step flashing, and flows onto the shingle. On a sided wall, the siding itself acts as the counter-flashing — the step flashing’s vertical leg tucks up behind the siding, the house wrap, and the wall sheathing, and the siding covers the top of the flashing leg.
The most common step flashing failure is a missing or deteriorated counter-flashing on a chimney. The step flashing itself may be perfectly intact, but without counter-flashing to cover its top edge, water blows behind it during every wind-driven rain. The homeowner sees a leak near the chimney, calls a roofer, and the roofer finds that the step flashing is fine but the counter-flashing has pulled out of the mortar joint.
Step Flashing vs. Other Types of Roof Flashing
Step flashing is one of several flashing types, each designed for a specific roof junction. Confusing them leads to the wrong repair and a persistent leak.
| Flashing Type | Shape | Where Used | Water Flow Direction |
| Step Flashing | L-shaped, individual pieces | Roof-to-wall junction parallel to slope | Down the wall, onto shingle, down roof |
| Apron Flashing | Single L-shaped piece, continuous | Bottom of chimney or skylight, perpendicular to slope | Down the roof, over the flashing, into gutter |
| Head Flashing | Z-shaped, continuous | Top of chimney, skylight, or window above roof | Over the top, diverted to sides |
| Valley Flashing | W-shaped channel, continuous | Internal roof angle where two planes meet | Down the valley centerline |
| Drip Edge | L-shaped, continuous | Eave and rake edges of roof | Off roof edge into gutter |
| Continuous (Wall) Flashing | Single long L-shaped piece | Roof-to-wall on low-slope or flat roofs | Down wall onto roof surface |
Continuous flashing — a single long L-shaped piece running the length of the wall — is sometimes incorrectly substituted for step flashing on sloped roofs. It fails because a roof expands and contracts with temperature changes, and a continuous piece of metal cannot move with it. The metal buckles, the sealant cracks, and the wall leaks. Step flashing pieces move independently with each shingle course, accommodating thermal expansion without failing.
Why Step Flashing Fails: The Three Most Common Problems
Improper overlap. A roofer who cuts corners installs the step flashing pieces with a ½-inch overlap instead of the required 2 inches. Wind-driven rain blows sideways between the pieces and finds the gap. This failure is common on production-built homes where the roofing subcontractor is paid by the square and has an incentive to finish fast.
Nailing through the flashing where it is exposed. Each step flashing piece is secured by a single nail in the top corner of the vertical leg, where the next piece of siding or counter-flashing will cover the nail head. A roofer who nails through the horizontal leg — the part that sits on top of the shingle — creates a hole directly in the water path. That nail hole becomes a leak within the first year. Step flashing should be nailed only through the wall leg, never through the roof leg.
Corrosion from incompatible metals. Copper step flashing secured with galvanized roofing nails will corrode the nails within 5 to 10 years. The nails fail, the flashing pieces loosen, and the wall leaks. The fix is to use copper nails with copper flashing, stainless steel nails with aluminum flashing, and galvanized nails with galvanized or Galvalume flashing.
FAQ: Common Questions About Step Flashing
Can step flashing be repaired without replacing the shingles?
Yes, if the flashing itself is intact and the problem is a failed sealant joint at the counter-flashing or a single loose piece. The roofer lifts the shingle above the failed piece, removes the damaged flashing, slides a new piece into place, and re-seals the shingle. If multiple pieces are corroded or the flashing was installed with improper overlap, the repair typically requires removing the shingles along the entire wall junction and re-installing the step flashing correctly. That repair costs $600 to $1,500 for a typical dormer sidewall.
Can a homeowner install step flashing?
A homeowner who is comfortable on a ladder and has basic roofing tools can install step flashing as part of a re-roofing project. The work is physically straightforward: lift shingle, slide flashing, nail through wall leg only, lay next shingle, repeat. The difficulty is not the technique but the access. Step flashing on a dormer sidewall requires working at the edge of the roof while reaching up the wall, which is awkward and unsafe on a steep roof without proper fall protection. Most homeowners are better off hiring a roofer for this specific repair.
How much does it cost to replace step flashing?
$600 to $1,500 for a typical wall-to-roof junction of 10 to 20 linear feet, including removal of the existing shingles along the wall, installation of new step flashing and counter-flashing, and re-shingling the area. A chimney step flashing replacement that also requires a new cricket or saddle at the top of the chimney costs $1,500 to $3,000.
Step Flashing Is the Smallest Part of the Roof That Causes the Biggest Leaks
Twenty dollars worth of step flashing incorrectly installed behind a dormer wall creates a $2,000 leak repair five years later. The flashing pieces are the cheapest material on the roof — a few dollars each for standard Galvalume — but they protect the single most vulnerable junction: the seam where a vertical wall meets a sloped roof surface.
If water is staining the ceiling near a dormer, a chimney, or a wall on the second floor, step flashing is the first thing to check. Not the shingles above the stain — the metal pieces hidden under the shingles at the wall line. The flashing fails before the shingles do, and it fails quietly, one piece at a time, until the stain appears on the ceiling and the roofer is called.