


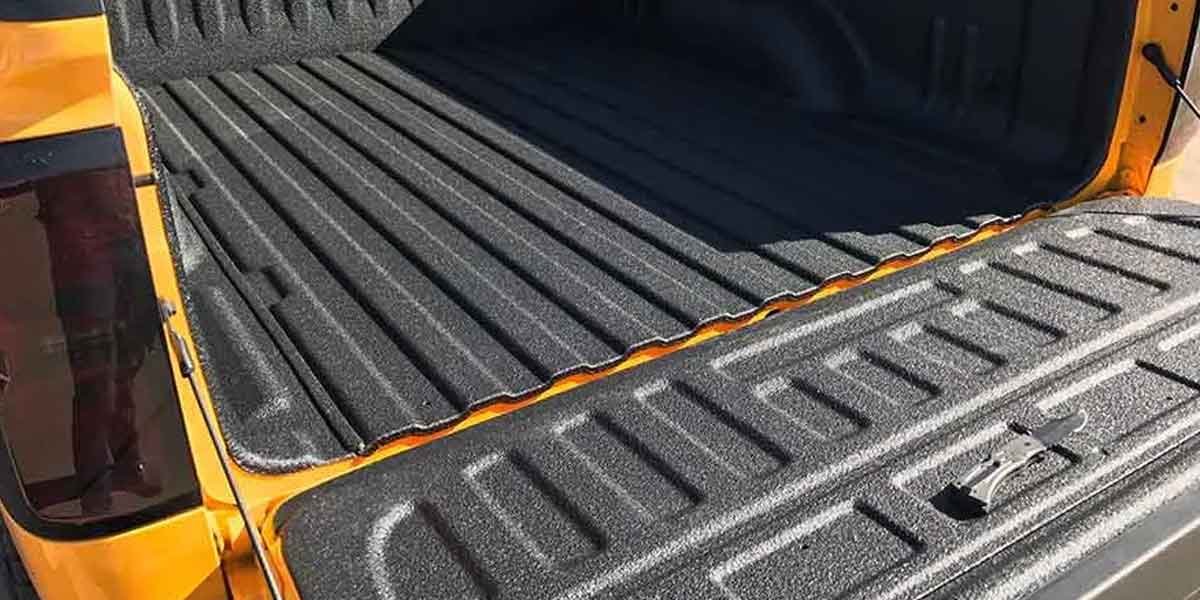
Bed liner coating systems provide a waterproof barrier for truck beds that guards against the elements, rust, scratches, and heavy impact damage. Many kits create a textured, non-skid surface that helps secure loads during transit. Here is how to achieve a professional finish with your bed liner spray kit:
Clean Surface Thoroughly
To achieve a professional result, clean surfaces using a high-quality wax and grease remover before starting the liner kit. Sanding over dirt may ground impurities deeper into the metal, causing the liner to bubble or peel away later. Saturate a clean rug and wipe the area until a fresh cloth shows no residue.
Scuff the Paint
Scuff the paint thoroughly using sandpaper or a scuff pad to remove traces of the factory’s glossy clear coat. For areas where a sanding block cannot reach, use a flexible scuff pad to create a uniform, matte profile. Once the surface looks dull and chalky, use an air hose to blow away all debris so it doesn’t mix with the bed liner spray. Finish with a solvent wipe to leave a clean surface. If you accidentally sand through the metal, apply an acid etch primer to prevent future corrosion before spraying the liner.
Mask Surrounding Areas
Mask surrounding areas using high-quality automotive tape, protective film, or paper to prevent leakage. Apply your tape along the exact lines where you want the liner to end. The tape helps establish clear lines and sharp boundaries along the top of the bed rails and around tailgate handles. Press down the edges firmly to prevent the thick liquid from bleeding underneath. After establishing the edges, you can use the masking paper to cover windows and tires. This helps protect them from overspray. Once done, peel the tape away while the liner is slightly tacky to avoid lifting or tearing the cured edge.
Mix Components Completely
Mix your bed liner spray kit components completely before applying them to promote a uniform reaction between the resin and hardener. Since the pot life begins as soon as the chemicals meet, mix one bottle at a time and spray immediately. Follow these steps to improve the quality of your mixture:
- Measure the mixing ratios
- Agitate the base resin
- Shake the combined liquids
- Monitor the pot life
While kits can be pre-measured, add the exact amount of activator required to prevent cracking or ineffectiveness. Before adding the hardener, stir the base material to redistribute the pigments and solids that settle during storage. Once you introduce the activator, shake the container to facilitate total integration.
Regulate Air Pressure
Regulate air pressure while spraying since the compressor PSI setting dictates the final texture of the spray kit. If the pressure is too low, the material will exit the gun in large globs, creating a chunky profile. Excessive pressure results in a sand-like finish that lacks depth. Use an air regulator at the base of the gun to prevent fluctuations in performance. Test spray on a piece of cardboard until you achieve a pebble-like texture before committing to the truck bed.
Explore a Bed Liner Spray Kit
During the application process, maintain a consistent spray distance to create a uniform pattern across the substrate. Overlap each previous stroke to avoid thin areas and hide transition lines. Contact a reputable DIY spray provider to learn more about their products.


